
EDU 214 - Teaching and Learning with Technology - Summer 2015
MAP OF ME

Student
Name:
Jackie Rivas-Parra
Date: 6/14/2015
Portfolio Artifact Description: Map of Me- Create a map of yourself describing five things about you. You are to use the Inspiration software that is used throughout CCSD.
What you learned: This project was a new one for me. I have never heard of this software and I am very glad I did. This software is very simple and helps to make projects like these easier to complete. I learned how to create a simple map, and use it to describe myself in many ways. With this new software I learned how to create new bubbles, copy and paste photos, as well as connecting each bubble to another. This project actually made me learn more about myself. I was went down memory lane for a moment as I entered my previous school and previous job. I also was excited looking into the future with my new job and new school I plan on transferring over to after I graduate from CSN.
National Educational Technology Standards for Teachers (NETS)•T Addressed: Standard #1 Students demonstrate creative thinking, construct knowledge, and develop innovative products and processes using technology. Found at http://www.iste.org/standards/iste-standards/standards-for-students
Application of Skills Learned for the Future: This project can help with basic skills for my future students. The software at first is a bit tricky to understand but once you get use to it things just flow right out of your mind. With this project I can also have my students use this software as a method to describe themselves. Since I plan on being an English teacher I feel I can use this software to have my students describe stories by dividing parts into the introduction, climax, main idea, conclusion, and etc. Looking into the future I feel this project can definitely benefit my students. This assignment will get the creative thinking skills flowing.
MY DREAM HOME

Student
Name:
Jackie Rivas-Parra
Date: 6/3/2015
Portfolio Artifact Description: Dream Home - Using drawing tools to create a fun and crazy my dream home which include, details such as doors, windows, room, and room labels.
What you learned: I learned with the dream home project that details take a very long time on order to look perfect. After hours of creating and erasing my dream home I was finally able to get the room designs to my liking. I learned to take inspiration from other floor plans and not to just simply copy one. I learned how a room layout should flow while also making sure there was enough room for my other rooms. I kept imagining myself inside my home as if I was talking a walk through the place in order to make it as realistic as possible. I also learned a simple box with other boxes in it was not going to cut it for a dream home. I tried to think outside of the box and added an indoor pool, gym, sauna, theater, and covered patio. I even made sure that my kitchen had a pantry and was also able to connect my kitchen to my dining room using open pathways. Using different line sizes also helped differentiate doors from windows and so on. I learned that a project like this will take time and you cannot expect to finish it speedy quick. I really enjoyed this project and hope someday to have a dream home just like this.
National Educational Technology Standards for Teachers (NETS)•T Addressed: Standard #1 Students demonstrate creative thinking, construct knowledge, and develop innovative products and processes using technology. Found at http://www.iste.org/standards/iste-standards/standards-for-students
Application of Skills Learned for the Future: Looking into the future I feel this project can definitely benefit my students. First off this assignment will get the creative thinking skills flowing. Students can also help one another by giving and receiving feedback on their dream homes. I also feel this exercise can give students inspiration for their future. A dream home can help someone to chase their dreams even harder. Overall I am very pleased with the assignment even after my headache and tired eyes. I hope to one day have this dream home.
GRAFITTI PAINTING

Student
Name: Jackie Rivas-Parra
Date: 6/5/2015
Portfolio Artifact Description: Graffiti Painting - Using drawing tools to create a fun and crazy image while using Professor Saladino’s face as a base. We are then to create a fictional story that goes along with the image.
What you learned: I really appreciate be given this assignment, it shows that learning should be fun too. At first I wasn’t too sure what I wanted to do with Professor Saladino’s hilarious base image. I tried maybe placing some funny glasses, or crazy teeth, but then I began to play with the copy and paste tool, and began to have fun creating a Cyclops look. After viewing different Cyclops images I came across one that I remember from an old film I remember watching in high school. I took my inspiration from there. This assignment helped me learn that using different tools is always beneficial than just using one. At first I was just using the paint brush, I then realized there are so many more than that. I used the water color to help create subtle lines that blended well with other lines. Instead of using the eraser, I would just paint over a spot with the same color and outline it with black to avoid any blank spots. I also learned that be given a free range of ideas makes for a lot more creative input.
National Educational Technology Standards for Teachers (NETS)•T Addressed: Standard #1 Students demonstrate creative thinking, construct knowledge, and develop innovative products and processes using technology. Found at http://www.iste.org/standards/iste-standards/standards-for-students
Application of Skills Learned for the Future: For my future students I feel this is an excellent exercise to use, especially one that can be used in the beginning of the school year to help break the ice between my students and I. This exercise not only helps breaks the ice, but it also helps to get to know your students and see what level of creativity they have. Students can also help one another with an idea, which promotes great communication and teamwork skills. I can honestly say I will more than likely use this assignment in my educational career.
CAN OF YOUR TOWN

Student
Name: Jackie Rivas-Parra
Date: 6/14/2015
Portfolio Artifact Description: Can of Your Town.- Taking the dimensions of a regular Campbell soup label, create a label about your town that will catch a shoppers attention
What you learned: I learned creating a label is not very easy and you have to make sure things are in their right place in order for it to make sense. I was attempted to create the Las Vegas sign as my logo and even added some pictures to help bring the look together. I learned how to create my own nutrition label and even change the background of my label. At first I had a very boring looking yellow background but then I decided to mess around with the gradient effect and was able to come up with a back that popped.
National Educational Technology Standards for Teachers (NETS)•T Addressed: Standard #1 Students demonstrate creative thinking, construct knowledge, and develop innovative products and processes using technology. Found at http://www.iste.org/standards/iste-standards/standards-for-students
Application of Skills Learned for the Future: I can use this project to have my students create a label about anything or anyone. They can create a label about their day, favorite subject, what they did over the summer, and even a good way to have them remember vocabulary words. This project helps with the appreciation of art and can have a great impact in the English classroom.
MY CLASSROOM
Student Name: Jackie Rivas- Parra
Date: 6/5/2015
Artifact Description:Your Classroom - Using drawing tools to create a bird’s eye view of your classroom, that contains walls, desks, windows, classroom furniture and a doorway.
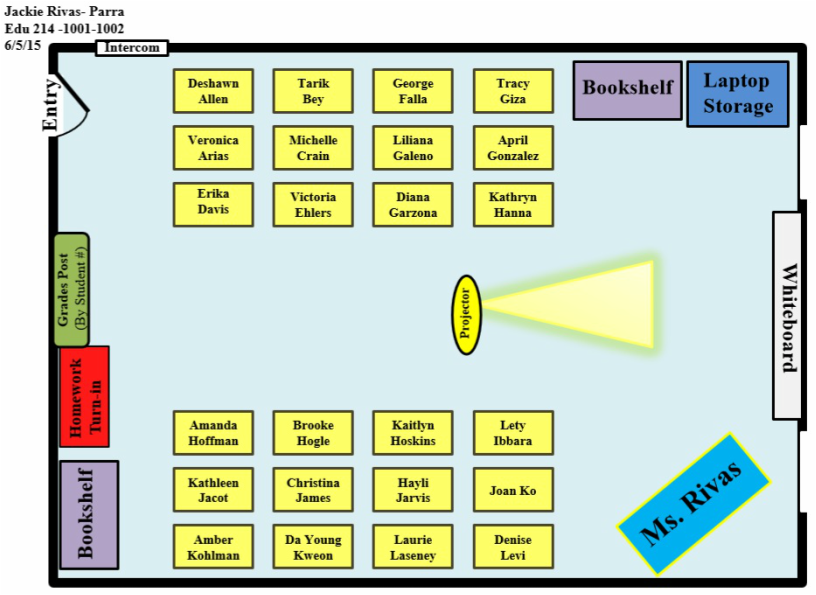
What you learned: I must say the “Your classroom” project was my most favorite out of all this week. I really felt like I was designing my very own classroom and pictured myself in the classroom. I took inspiration from my one of my high school history classes while creating my classroom. I really like how the class is divided up and face each other. I feel this layout of desk makes for really good discussions in class. I remember in high school my class would have never ending discussions which would at times turn into very interesting debates. I feel everyone gets involved this way and makes class a lot more fun for everyone. I learned that using Microsoft PowerPoint is a lot easier to use to make precise line and shapes rather than using paint. I used paint for my dream home project and felt it did not look as sharp and took me a lot longer to complete. I also learned that using colors in my projects makes things more interesting and help certain things to stand out. I feel that when I have my own classroom I will have grades posted every week for students to keep updated, but these grades will be posted by student numbers. I want to have laptops in my classroom available for students at all times. Since I plan on teaching an English class I feel laptops are going to play a very crucial role in my classroom, as well as the books I plan on having for my students. My projector will play a very important role as well as I will plan on showing films, power points, and I will definitely want to have my students present their projects in front of the class. Overall I learned a lot from this project and really appreciate all the step by step tips I was provided. Thank you very much!
National Educational Technology Standards for Teachers (NETS) •T Addressed: Standard #1 Student demonstrates creative thinking, construct knowledge, and develop innovative products and processes using technology. Found at http://www.iste.org/standards/iste-standards/standards-for-students
Application of Skills Learned for the Future: I don’t think I faced many hurdles in this project. The only one I would say would have to be trying not to overcrowd my classroom with all my ideas. I probably could have put more things in my classroom but I did not want to make it feel cluttered. The labeling was the easiest maybe because that meant I was done with everyone and just needed the finishing touches. Color coating my furniture also made for an easy approach in my classroom. This project should definitely make other teachers feel inspired. It should also be helpful in the organization for a teacher’s classroom. The desk help for assigned seating and the layout of desk will help with class discussions. A bulletin board design of students work can also help cover the concepts of learning how to manipulate drawing objects on screen. Another cool idea I had would be to design posters you would like to have in your classroom for students to take information or inspiration from.
Date: 6/5/2015
Artifact Description:Your Classroom - Using drawing tools to create a bird’s eye view of your classroom, that contains walls, desks, windows, classroom furniture and a doorway.
What you learned: I must say the “Your classroom” project was my most favorite out of all this week. I really felt like I was designing my very own classroom and pictured myself in the classroom. I took inspiration from my one of my high school history classes while creating my classroom. I really like how the class is divided up and face each other. I feel this layout of desk makes for really good discussions in class. I remember in high school my class would have never ending discussions which would at times turn into very interesting debates. I feel everyone gets involved this way and makes class a lot more fun for everyone. I learned that using Microsoft PowerPoint is a lot easier to use to make precise line and shapes rather than using paint. I used paint for my dream home project and felt it did not look as sharp and took me a lot longer to complete. I also learned that using colors in my projects makes things more interesting and help certain things to stand out. I feel that when I have my own classroom I will have grades posted every week for students to keep updated, but these grades will be posted by student numbers. I want to have laptops in my classroom available for students at all times. Since I plan on teaching an English class I feel laptops are going to play a very crucial role in my classroom, as well as the books I plan on having for my students. My projector will play a very important role as well as I will plan on showing films, power points, and I will definitely want to have my students present their projects in front of the class. Overall I learned a lot from this project and really appreciate all the step by step tips I was provided. Thank you very much!
National Educational Technology Standards for Teachers (NETS) •T Addressed: Standard #1 Student demonstrates creative thinking, construct knowledge, and develop innovative products and processes using technology. Found at http://www.iste.org/standards/iste-standards/standards-for-students
Application of Skills Learned for the Future: I don’t think I faced many hurdles in this project. The only one I would say would have to be trying not to overcrowd my classroom with all my ideas. I probably could have put more things in my classroom but I did not want to make it feel cluttered. The labeling was the easiest maybe because that meant I was done with everyone and just needed the finishing touches. Color coating my furniture also made for an easy approach in my classroom. This project should definitely make other teachers feel inspired. It should also be helpful in the organization for a teacher’s classroom. The desk help for assigned seating and the layout of desk will help with class discussions. A bulletin board design of students work can also help cover the concepts of learning how to manipulate drawing objects on screen. Another cool idea I had would be to design posters you would like to have in your classroom for students to take information or inspiration from.
TRUSS BRIDGE

Student
Name:
Jackie Rivas-Parra
Date: 6/5/2015
Portfolio Artifact Description: Truss Bridge - Using drawing tools to create a 2 dimensional layout of a truss bridge.
What you learned: The Truss Bridge project took me a lot longer than I thought it would. I started with a complicated design and realized it was not working very well. I tried three times and kept starting a new bridge. I fell asleep woke up and said this needs to get done. So I decided to focus on one single Google sample and not five separate ones. I was able to complete my bridge with a simple design and I really loved the final product. My main focus was to seem as if I was floating down a river towards my bridge just like the instructions asked. After that everything seemed to fall into place. Looking at my bridge I felt I need to add a base support to make it more realistic, so I copy and pasted some lines and boom my bridge deserves a spot on the web!
National Educational Technology Standards for Teachers (NETS)•T Addressed: Standard #4 Students will use critical thinking skills to plan and conduct research, manage projects, solve problems, and make informed decisions using appropriate digital tools and resources. Found at http://www.iste.org/standards/iste-standards/standards-for-students
Application of Skills Learned for the Future: This project is definitely one to get you thinking. I think this project is an excellent way to teach children the basics of drawing and creating objects using technology. The hard part isn’t drawing but making sure your lines are all equal and symmetrical. I feel I could use this project even in high school, a good way to show students the base of technology and also making sure they do not forget these important base skills.
JEOPARDY GAME

Student
Name: Jackie Rivas- Parra
Date: 6/19/2015
Artifact Description: Jeopardy Game- Create a Jeopardy Game on any topic with the use of PowerPoint software. You will need to create a hyperlink for each slide in order for the game to work properly.
What you learned: I have always wondered how my teachers in grade school were able to create their very own jeopardy game. I always wondered how they were able click a link and then be brought to another slide. Well after completing this project I was able to answer all my questions. Today I learned how to properly link one slide to another. I learned how to create multiple slides and how to organize my slides in order to create an organized game. I learned how to create a variety of questions and answers for my Jeopardy game. I learned simple methods of organization and simple methods for linking. I had some trouble at first with some questions but I was able to look up trivia questions on Google and from there I felt inspired. After completing this project I feel very confident in saving this Jeopardy game and playing it with my family, friends, as well as my future students.
National Educational Technology Standards for Teachers (NETS) •T Addressed: Standard #1 Student demonstrates creative thinking, construct knowledge, and develop innovative products and processes using technology. Found at http://www.iste.org/standards/iste-standards/standards-for-students
Application of Skills Learned for the Future: I feel this project can be very useful for any grade student. I remember playing this as early as elementary school and even in college. So therefore this game can be applied to anyone at anytime. I will use this game in my English classroom and plan on changing the questions regularly for my students as the semester develops. I even plan on playing with them with just random fun questions I know they will enjoy. This is definitely an exercise that provided another tool under my belt.
WEB LAUNCH

Student
Name:
Jackie Rivas-Parra
Date: 6/14/2015
Portfolio Artifact Description: Web Launch Pad- create an interactive learning activity for students by attaching a web blink to your texts.
What you learned: I have never known how to attach a website to a text. Today I have learned a new skill and I plan on using it a lot more often. I learned how to create a simple activity for kids and also can create a very creative one as well. This was y first time creating such an activity so it may have been a little simple but for the future I do plan on creating something a lot more in depth. I also learned that students learn in a variety of ways so I can link videos, web pages, definitions, and even games to help my students comprehend the subject I want them to learn.
National Educational Technology Standards for Teachers (NETS)•T Addressed: Standard #1 Students demonstrate creative thinking, construct knowledge, and develop innovative products and processes using technology. Found at http://www.iste.org/standards/iste-standards/standards-for-students
Application of Skills Learned for the Future: This project is definitely one for the books. I can use this activity for anything in the world. Whether it be math science, reading, or writing, I can really make learning fun for my students and make the process of it fun for me. I can create my own website and have my students log on, play games, and learn with a variety of activities of my own.
WHEEL O' FORTUNE

Student
Name: Jackie Rivas- Parra
Date: 6/18/2015
Artifact Description: Wheel O’ Fortune Spreadsheet- Create a spreadsheet using the data from a poem to learn how to predict the probability of letters occurring in the English language.
What you learned: I have always stayed away from spreadsheets because I had never really taken the time to figure out how to use one. I know a spreadsheet is very important for many aspects in life. I consider myself a very quick learner so I am glad I was able to pick up on this skill very quickly as well. I learned what a cell was and what each one is for. I learned each column has a different job tailored to your every need. I learned shortcuts as to how get percentages down for every number. In Microsoft Word, I even learned how to find an exact count of whatever number, letter, or character you are looking for by simply clicking on the find button. I even learned how to take all my data from my spreadsheet and turn into any type of chart I need.
National Educational Technology Standards for Teachers (NETS) •T Addressed: Standard #1 Student demonstrates creative thinking, construct knowledge, and develop innovative products and processes using technology. Found at http://www.iste.org/standards/iste-standards/standards-for-students
Application of Skills Learned for the Future: I feel this project can be very useful for any grade student. It is important for students to learn different methods of math while using technology. I can definitely see myself using this simple exercise to get my students familiar with using the spreadsheet program. Eventually I can have students create different types of charts with a variety of data they have gathered for that assignment.
FINAL TECHNOLOGY LESSON PLAN
ABC COMMUNITY SCHOOL (2015-2016)
Ms. Rivas 11th Grade English
• Name of lesson: All About Me (Animaker)
• Grade Level Appropriateness: 6th-12th
• Technology Content Standard Addressed: Common Core Standard: 1. Creativity and Innovation, students demonstrate creative thinking, construct knowledge, and develop innovative products and process using technology.
• Other Content Standard Addressed: English Language Arts Standard for grades 11th-12th: Presentation of Knowledge and Ideas-:4- Make strategic use of digital media (e.g., textual, graphical, audio, visual, and interactive elements) in presentations to enhance understanding of findings, reasoning, and evidence and to add interest.
• Objective: Students will learn how to use create an animated video using the web source “Animaker”. Students will present their all about me animated video to the class.
• Materials needed to facilitate the lesson: Computer, ability to access the internet, Animaker web source, an email address, YouTube account, and a creative mind.
• Suggested group size: Students will work independently but will be allowed to work with a partner for creative advice.
• Procedures:
1. Go to http://www.animaker.com/ and click “Sign Up” on the top right hand side. You will be creating a free account, so you will need an email and password. Once you have entered all your information click sign up, a confirmation link will be sent to your email in order for you to access your Animaker account.
2. Once you have set up your account and have been logged in you will be brought to the dashboard page. There you will find a link that says “Launch Now” or on the top right a button that says “Create Video”. You may click on either one they will both bring you to the same page. Once you have made it to this page you will find several templates to choose from. I suggest you choose a BLANK TEMPLATE; it will be easier to customize your video this way.
3. After you have chosen your template you will be brought to the “Create a Video” page. Before you begin there is a tutorial video, PLEASE WATCH THE WHOLE VIDEO. This will help you master Animaker since this is the first time we are using this program.
4. Now that you have mastered Animaker you may begin working on your video. Since this is a free account you are limited to 2:00 minutes however I would like your video to be AT LEAST 1:00 long. Be as creative as you like, I am looking for photos, audio, and information on you. A simple my favorite color, name, and birthday, will not cut it. This is your chance to show your class your creativity and also who you are. Have fun with this project because they are a lot of fun to watch. Make sure to save your video throughout the process so you will not lose your work.
YOUR VIDEO MUST INCLUDE THE FOLLOWING!
· Your Name, Age, Birthday, Likes, Dislikes,
· Where You Are From and Your Family Background
· 2 Things We May Not Know About You
· Photos
· Sound
· At least 1 minute in length
5. Once you have completed your video click the settings button on the right top corner. Click “Export”, here you will be able to attach your YouTube account and then upload your video. Please title your video “English: All About Me (Animaker)” with your name in the description box. Also make sure you set your video as Public so I can pull it up when it is time for you to present. The site says your video will be fully delivered in 24 hours, however it will be ready to view in just a few minutes so don’t freak out.
Here is my sample video https://www.youtube.com/watch?v=0BEqTX5pgB0
Be prepared to answer any questions your classmates may have for you! If you need any help do not hesitate to ask! Let’s have fun getting to know one another and I look forward to this year with you! J
• Assessment: Students will be graded on their creativity and ability to follow directions. This assignment is worth 40 points:
· 1pt Your Name
· 2pts Age
· 2pts Birthday
· 2pts Likes
· 2pts Dislikes
· 2pts Where You Are From
· 2pts Your Family Background
· 2pts 2 Things We May Not Know About You
· 5pts Photos
· 5pts Sound
· 5pts At least 1 minute in length
· 5pts Video was creatively developed based on question examples (Name, Age, Birthday, etc.)
· 5 pts Student was able to respond to questions via open discussion
STUDENT SAMPLE: This is a sample video of what I expect my students’ work to look like
